




Visit https://docs.vbrowser.io/ for official and in-depth documentation.
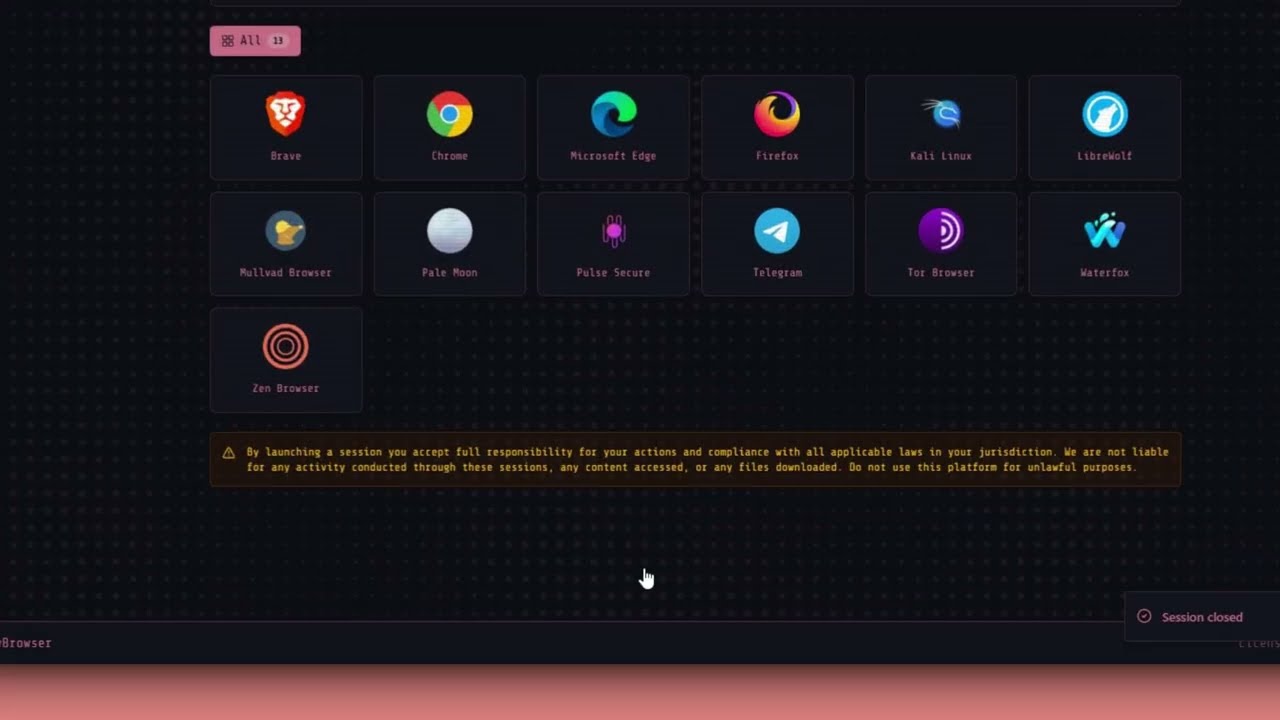
vBrowser was initially created by Joseph Fisher, a Cyber Threat Intelligence manager, to assist with deep and dark web investigations while not exposing identity and remaining covert. The vBrowser team realized that many SOCs lack the tools or sandboxed environments needed for proper investigations. vBrowser provides companies and individuals access to this infrastructure at a minimal price, lowering the barrier for those who cannot afford expensive subscription services with paywalled features. Our ultimate goal is to give back to the community — enhancing cyber investigations and helping keep people safe.
- Supported Architecture & Platforms
- Prerequisites
- Getting Started
- What
setup.shDoes - Reverse Proxy Options
- Redeploying Code Changes
- Destroying the Deployment
- Supported Browsers & OS Images
- License
| Architecture | Platform | Supported | Notes |
|---|---|---|---|
amd64 |
Linux | Yes | Fully tested and supported |
amd64 |
Windows | Likely | Not tested, but expected to work |
aarch64 |
Linux | Likely | Not tested, but expected to work |
arm64 |
Linux | Likely | Not tested, but expected to work |
OvB has only been tested on Linux (amd64) systems. All documentation currently assumes a Linux environment.
To run OvB's infrastructure components, you'll need Terraform. Here's how to install it on a Debian-based Linux system (e.g. Ubuntu):
1. Update and install prerequisites
sudo apt-get update -y && sudo apt-get install -y gnupg software-properties-common2. Install the HashiCorp GPG Key
wget -O- https://apt.releases.hashicorp.com/gpg | \
gpg --dearmor | \
sudo tee /usr/share/keyrings/hashicorp-archive-keyring.gpg > /dev/null
3. Add the official HashiCorp repository
echo "deb [arch=$(dpkg --print-architecture) signed-by=/usr/share/keyrings/hashicorp-archive-keyring.gpg] \
https://apt.releases.hashicorp.com $(grep -oP '(?<=UBUNTU_CODENAME=).*' /etc/os-release || lsb_release -cs) main" | \
sudo tee /etc/apt/sources.list.d/hashicorp.list
4. Download package information and install
sudo apt update -y && sudo apt-get install -y terraformTerraform needs AWS credentials to provision the ECS, ECR, VPC, and IAM resources.
1. Sign in to AWS
Go to https://aws.amazon.com/console/. Using an IAM user (rather than root) with the required permissions is recommended.
2. Create Access Keys
- Navigate to IAM → Users → your user → Security credentials.
- Click Create access key and copy:
AWS_ACCESS_KEY_IDAWS_SECRET_ACCESS_KEY
You will only see the secret key once. Store it securely.
3. Export credentials
export AWS_ACCESS_KEY_ID="your-access-key-id"
export AWS_SECRET_ACCESS_KEY="your-secret-access-key"
The region is set interactively during
setup.sh— no manual configuration required.
OvB uses Cloudflare to dynamically create a DNS A record for each browser session.
1. Create a Cloudflare account at https://dash.cloudflare.com/sign-up (free tier is sufficient).
2. Add your domain to Cloudflare and update your registrar's nameservers to the ones Cloudflare provides.
3. Copy your Zone ID from the domain's Overview page in the Cloudflare dashboard (bottom-right).
4. Create an API Token
- Visit https://dash.cloudflare.com/profile/api-tokens
- Click Create Token → use the Edit zone DNS template
- Set permissions:
Zone.DNS: Edit, scoped to your specific zone - Copy the token — you will only see it once
Do not use the Global API Key. It grants full account access.
git clone https://github.com/fish-not-phish/open-vbrowser.git
cd open-vbrowserexport AWS_ACCESS_KEY_ID="your-access-key-id"
export AWS_SECRET_ACCESS_KEY="your-secret-access-key"cd terraform
./setup.shsetup.sh will interactively prompt for everything else — your domain, Cloudflare Zone ID and API token, AWS region, database credentials, and Django admin credentials. See What setup.sh Does for the full breakdown.
- Prompts you to select which browser/OS images to install (or install all).
- Updates
terraform.tfvarswith your selected image list. - Interactively prompts for all required configuration — domain, database credentials, Redis URL, Cloudflare Zone ID and API token, AWS region, and Django superuser email/password — then writes everything to
docker/.env. Also setsaws_regioninterraform.tfvarsto match your input. - Runs
terraform initandterraform apply -auto-approveto provision all AWS infrastructure (VPC, subnets, security groups, ECR repository, ECS cluster, IAM roles and user, CloudWatch log groups, ECS task definitions). Terraform then appendsECR_REGISTRY,SUBNET_ID,SECURITY_GROUP_ID,AWS_ACCESS_KEY_ID, andAWS_SECRET_ACCESS_KEYtodocker/.env. - Builds and pushes only your selected browser/OS images to ECR via
build_browsers.sh(injects Cloudflare and domain values into each image at build time). - Runs
docker compose build --no-cacheusingdocker/docker-compose.ymlto build the backend and frontend images. - Starts all services with
docker compose up -d.
setup.shis for first-time provisioning only. To redeploy code changes, see Redeploying Code Changes.
Three compose files are provided. Pick whichever fits your setup:
| File | Reverse proxy | TLS |
|---|---|---|
docker-compose.traefik.yml |
Traefik | Automatic via Cloudflare DNS challenge |
docker-compose.nginx.yml |
Nginx + Certbot | Let's Encrypt HTTP challenge |
docker-compose.caddy.yml |
Caddy | Automatic Let's Encrypt HTTP challenge |
docker-compose.yml (no reverse proxy) is used by setup.sh for initial provisioning.
- Edit
docker/nginx/nginx.conf— replace every occurrence ofOVB_DOMAINwith your domain. - Add
CERTBOT_EMAILtodocker/.env. - Start the stack (HTTP only — the HTTPS block is commented out until the cert exists):
cd docker
docker compose -f docker-compose.nginx.yml up -d- Run Certbot to obtain the initial certificate:
docker compose -f docker-compose.nginx.yml run --rm ovb_certbot- Uncomment the HTTPS
server { }block indocker/nginx/nginx.conf, then reload:
docker compose -f docker-compose.nginx.yml exec ovb_nginx nginx -s reloadTo renew certificates later:
docker compose -f docker-compose.nginx.yml run --rm ovb_certbot renew
docker compose -f docker-compose.nginx.yml exec ovb_nginx nginx -s reload- Edit
docker/Caddyfileand replaceexample.comwith your domain. - Start the stack — Caddy handles certificate issuance and renewal automatically:
cd docker
docker compose -f docker-compose.caddy.yml up -d
Traefik uses Cloudflare DNS challenge. Ensure CF_Zone_ID and CF_Token are set in docker/.env, then:
cd docker
docker compose -f docker-compose.traefik.yml up -dAfter modifying backend or frontend code, rebuild and restart using whichever compose file you are running:
cd docker
docker compose -f docker-compose.traefik.yml build --no-cache
docker compose -f docker-compose.traefik.yml up -d --force-recreate
docker compose restartdoes not re-read.env. Always use--force-recreateto pick up environment changes.
To tear everything down cleanly — including all AWS resources and local containers:
cd terraform
./destroy.sh
This will destroy all Terraform-managed AWS infrastructure (ECS, ECR, VPC, IAM, etc.) and stop all Docker containers. To redeploy from scratch, run ./setup.sh again.
| Browser / OS | Selection name | |
|---|---|---|
 |
Brave | brave |
 |
Chrome | chrome |
 |
Code Server | code-server |
 |
Microsoft Edge | edge |
 |
Firefox | firefox |
 |
Floorp | floorp |
 |
Kali Linux | kali |
 |
LibreWolf | librewolf |
 |
Mullvad Browser | mullvad |
 |
Pale Moon | palemoon |
 |
Pulse Secure | pulse |
 |
Telegram | telegram |
 |
Terminal | terminal |
 |
Tor Browser | tor |
 |
Ubuntu | ubuntu |
 |
Vivaldi | vivaldi |
 |
Waterfox | waterfox |
 |
Zen Browser | zen |
Images are configured in terraform/terraform.tfvars under docker_images. Only the images listed there will have ECS task definitions created and will be built/pushed by build_browsers.sh.
This project is licensed under a custom Non-Commercial License.
You may use, modify, and distribute the software for personal and educational use only.
Commercial use and resale are strictly prohibited without express written permission from the author.